Pet choking is one of those emergencies that seems to happen without warning. A dog grabs a chew toy, a cat bats at a stray piece of string, and suddenly the airway is blocked. While veterinary help is essential, the first moments of a choking emergency are often in the owner’s hands. Learning the basics of pet choking first aid can give you the confidence to act quickly and safely. The steps below follow the first aid guidance published by veterinary organizations and national pet first aid programs, including the American Red Cross. Your goal is simple: clear the airway if it is safe to do so, keep the animal as calm as possible, and get to a veterinarian without delay.
Act Fast, But Act Safely
When your pet starts making sudden gagging or coughing sounds, you may not know at first whether the airway is truly blocked. Some pets clear minor irritations on their own. A pet that is genuinely choking will not improve without help. The first aid techniques taught for dogs and cats are designed for a conscious pet that is still awake and struggling to breathe. If your pet loses consciousness or stops breathing, treat the situation as a critical emergency and seek veterinary care immediately.
Your mindset matters as much as your technique. A choking pet is frightened, and a frightened animal may react unpredictably. Move calmly and deliberately. If another person is in the home, ask them to help steady the pet while you examine the mouth. Carefully restraining your dog or cat before you begin is a safety step first aid guides emphasize. A normally gentle pet may snap when it cannot breathe, so never assume a panicked animal will stay still for treatment.
Step One: Look Inside the Mouth and Remove a Visible Object
The first move in pet choking first aid is to look inside the mouth. Open your pet’s mouth and pull the tongue forward so you have a clear view of the back of the throat. Sweep inside with your finger to try to dislodge anything that may be blocking the airway. If you can see an object, gently try to remove it with your fingers. At the same time, be careful not to push the object deeper. A downward or inward push can wedge the obstruction more firmly in place, so keep your movements gentle and controlled.
Restrain Your Pet Before You Look
Restraint comes before the examination. Carefully hold your pet steady while another person opens the mouth and pulls the tongue forward. This position gives you the safest and clearest view of the airway. If you are alone with a small dog or cat, you may be able to restrain the pet with one arm while using your other hand to check the mouth. Do not spend too long trying to grab an object that is hard to reach. If the object does not come out quickly, move on to abdominal thrusts.
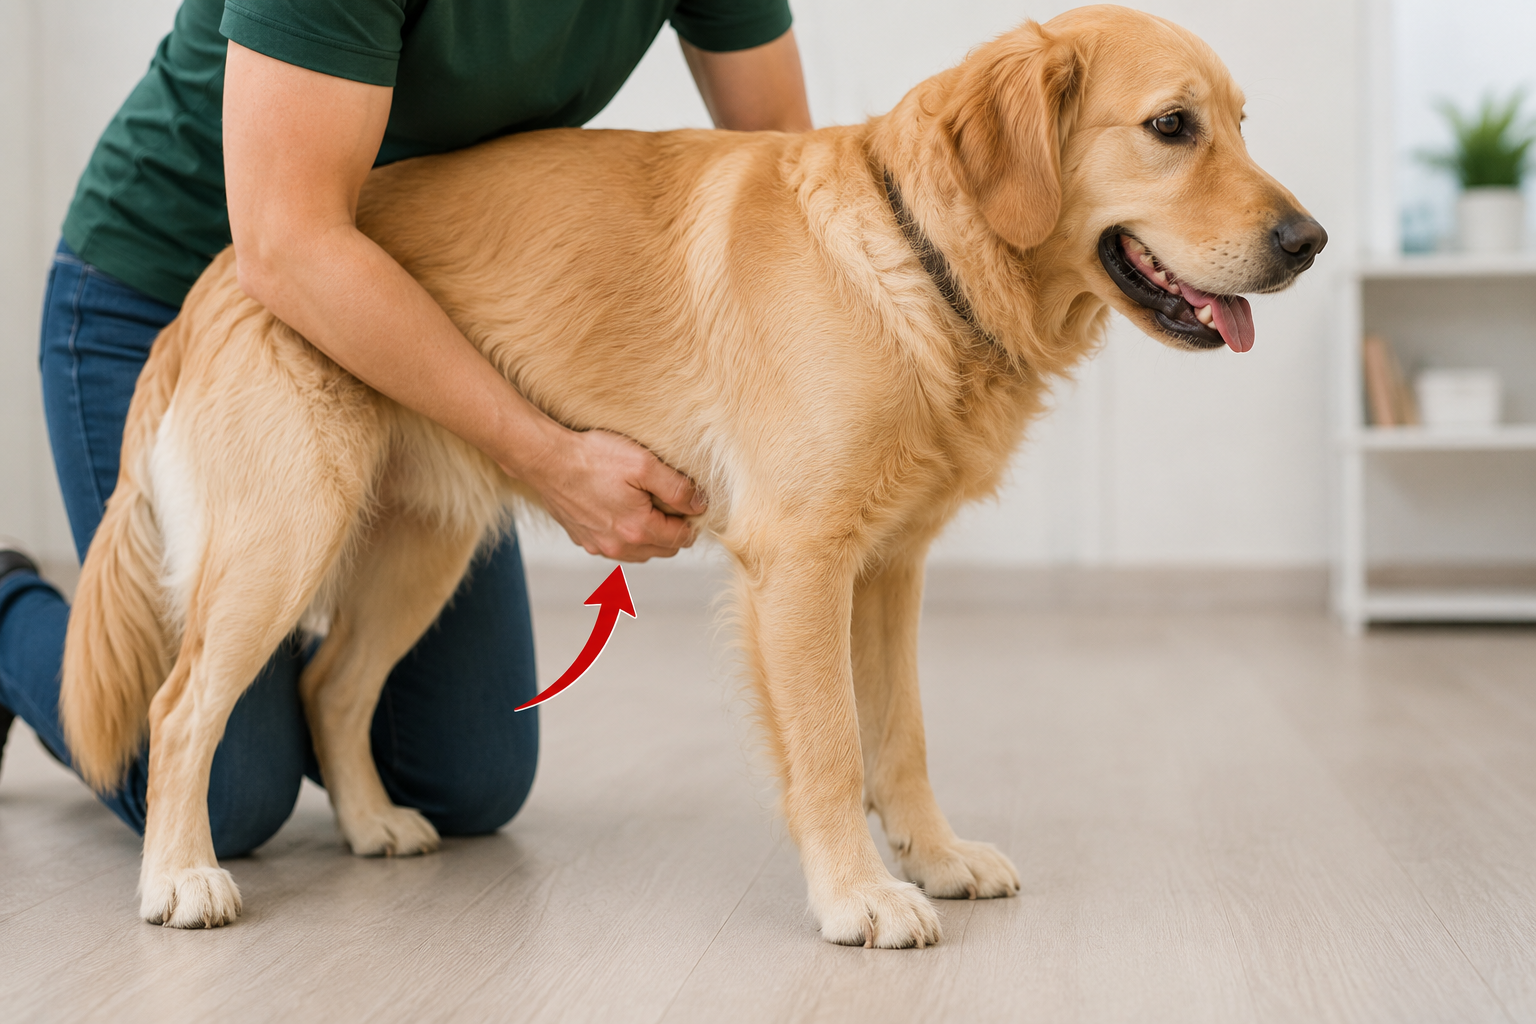
Step Two: Give Five Abdominal Thrusts
If the object is not visible or cannot be removed, move directly to abdominal thrusts. This is the same principle used in the Heimlich maneuver for humans. Give five quick abdominal thrusts with either one hand or two, pressing firmly inward. For a small dog or cat, you may find it easier to hold the pet up underneath the front armpits with one hand while you apply pressure with the other. For a larger dog, steady the animal from behind and deliver the thrusts with both hands placed on the abdomen.
- Position your pet so you can reach the abdomen comfortably.
- Place one hand or two hands on the abdomen, depending on the size of the pet.
- Give five quick abdominal thrusts using a firm, inward motion.
- Stop, recheck the mouth, and remove the object if it has become visible.
- Repeat the cycle of five thrusts if the airway is still blocked.
Each round of abdominal thrusts forces air out of the lungs and can push the object back up toward the mouth. Check the mouth after each round of five thrusts so you can remove the object as soon as it appears. Do not resume thrusting if the pet is coughing forcefully on its own, since a strong cough may be enough to clear the airway.
Step Three: Use Chest Thrusts If Your Pet Is Lying Down
Some pets are easier to help while they are lying on their side, and many first aid guides teach chest thrusts as part of a choking response. Lay your pet on their side and place both hands on the side of the rib cage. Push quickly and firmly, or strike the rib cage with the flat of your hand. The goal is the same as with abdominal thrusts: create a burst of pressure inside the chest to dislodge the object blocking the airway.
Chest thrusts can be a helpful alternative for pets that are too large to hold, or for animals that become weak and lie down during the emergency. Alternate between checking the mouth and delivering thrusts so you do not miss the moment when the object moves into view. Keep your strikes and thrusts firm but controlled. A choking pet is already in distress, and the purpose of each technique is to restore breathing, not to cause additional injury.
What Not to Do During a Pet Choking Emergency
Knowing what to avoid is just as important as knowing the steps. When you sweep the mouth or try to remove an object, do not push it deeper into the throat. If you cannot see the object clearly, do not keep probing blindly. Repeated attempts to grab an unseen object can waste valuable time and may push the obstruction further down. Do not try to give your pet food, water, or medication during a choking episode. The airway needs to be clear before anything is swallowed.
Do not wait to see whether your pet improves on its own. First aid guidance for dogs and cats is clear that owners should contact their veterinarian and be on the way to the practice. Even if the object comes out quickly, the episode is not over. Your veterinarian needs to know that a choking emergency occurred and how you responded at home.
After the Airway Is Clear, Still Contact Your Veterinarian
Once your pet is breathing normally and the object is out, your work is not finished. Veterinary first aid advice instructs owners to contact their vet and be on the way to see them. A pet can seem perfectly fine after the object is removed, but a full examination is the only way to confirm that the airway is completely clear and that nothing was left behind. Let the veterinary team know exactly what happened, which techniques you used at home, and how your pet behaved during the episode.
For pet owners in the Wareham area and across southeastern Massachusetts, Wareham Animal Hospital provides emergency care and advanced diagnostic services. In a choking emergency, begin first aid immediately, but also plan to reach a veterinary team quickly. Advanced tools such as ultrasound and echocardiography allow veterinarians to evaluate the airway, the chest, and the heart after a stressful event, giving you a complete picture of your pet’s recovery.
Be Prepared With a Pet First Aid Kit and Training
Emergencies are easier to manage when you have prepared ahead of time. Pet first aid courses cover the basics of response, including how to make a cat and dog first aid kit, how to approach an aggressive or frightened animal safely, and how to perform choking first aid and CPR. Taking an online course or attending a local class gives you the chance to practice these steps before you ever need them in a real emergency.
Your preparedness also includes your home environment. Supervise pets when they are playing with toys, chewing on items that could splinter, or eating treats that might be swallowed whole. Small household objects can become choking hazards just as easily as pet toys can. A few minutes of prevention and a clear mental picture of the first aid steps can make a genuine difference if your pet ever needs help.
Frequently Asked Questions
Can I perform the Heimlich maneuver on my dog?
Yes. The Heimlich maneuver for a choking dog uses quick abdominal thrusts. Give five rapid abdominal thrusts with a firm inward motion, using one hand or two depending on the size of the dog. For a small dog or cat, first aid instructors recommend holding the pet up underneath the front armpits with one hand while you apply pressure with the other. Check the mouth after each round of five thrusts.
What do I do if my pet is conscious but still choking after my first aid attempts?
If the object does not come out after your initial attempts, continue the cycle of checking the mouth and delivering thrusts while you prepare to leave for the veterinarian. First aid guidance tells owners to contact their veterinarian and be on the way to the practice. Do not stop trying to clear the airway, and do not wait at home to see whether the pet improves on its own.
Is it safe to sweep my finger inside my pet’s mouth?
Sweep inside the mouth only when you have opened the mouth and can see clearly. Pull the tongue forward, sweep gently with your finger to dislodge the object, and be careful not to push it deeper into the throat. A choking pet may bite out of fear, so carefully restrain your pet before examining the mouth. If an object is not visible, focus on abdominal thrusts instead of probing blindly.
If the object comes out, do I still need to see the veterinarian?
Yes. First aid guidance recommends contacting your veterinarian and being on the way to the practice even after your pet appears to be breathing normally again. The veterinary team can examine your pet thoroughly to confirm the airway is clear and to assess the effects of the choking episode. Always let your veterinarian know what happened and which first aid steps you performed.